


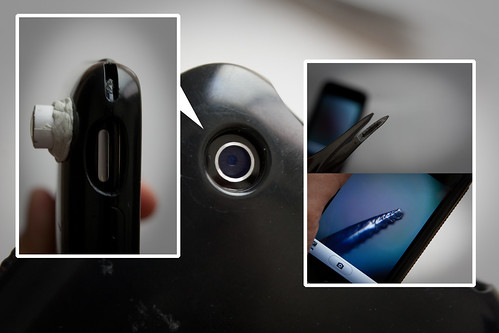
Wow.. Jom SLR lenses pada iPhone?? boleh ke?? kah3 aku seorang pengguna iPhone yang suka sangat mengambil gambar. Macam-macam Apps aku guna untuk ambil gambo... salah satu contoh apps yang paling best adalah Pro HDR lah..mana taknyer amek Gambo HD!! Tapi aku takpernah terpikir nak pasang lens kat iPhone ..!! ahaks .. Tgk pixx bawah nih :-
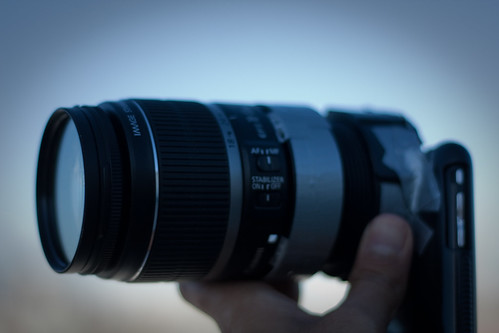
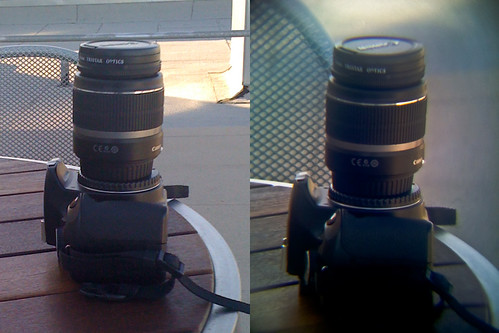
18-55mm lens dipasang.
iPhone 3GS.
2. Kenapa?
-Ahaks... mungkin agak shaky jugak nak pegang sebab attach nyer hanyalah menggunakan tape dan getah..tapi seriusly nampak Fun..!! so Post kali nih aku nak ketengahkan cara-cara nak pasang Lens pada iPhone anda!! kepada yang takda kerja...bleh lag Try..Ahaks!! Enjoy!!
p/s:- Credit to Photoble.com
Construction
In keeping with my other optics experiments, I wanted to try something that required the minimum amount of dis assembly of expensive components (i.e. no warranty voiding!), as well as being cheap and relatively easy to assemble. The parts list (roughly) is:
- Camera phone (in this case, an iPhone)
- SLR lens (in this case, two Canon EF lenses)
- Old surplus canon lens end cap
- Hard phone case (cheapie iPhone case, ~US$10)
- Old optical mechanism from a CD or DVD player (scrap - cost me $0)
- Bit of old sticky putty (again, $0)
- Cardboard tube for testing
- 2-inch PVC pipe couplers (about US$3 each)
- Duct tape
Step 1:
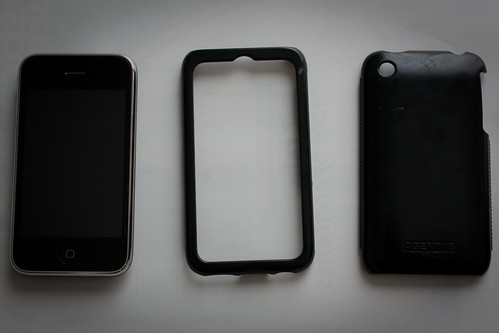
Get the case off the phone first. This particular design doesn't do anything destructive to the phone or the case, but it's a good idea not to tempt fate :)
Step 2:
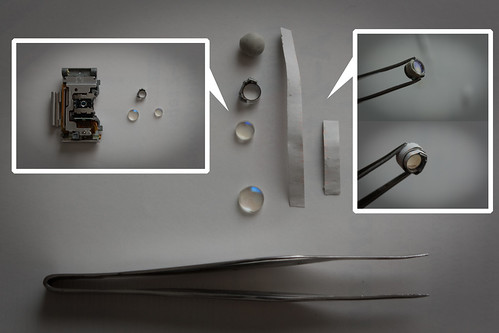
You'll need to take laser pickup (see left inset, above) out of the CD player and start to pull it to bits. I was able to get three lenses out; you'll need to verify that each one is a magnifier. These can be stacked to achieve more magnification of the lens aperture (when it is attached); the more you can magnify, the less vignetted the image will be.
I wrapped a thin layer of putty around the edges of the stacked lenses to stick thin strips of paper around the edges of the lenses. This is so that they can be assembled together and handled as a single unit.
Step 3:
Take the lens stack and insert it into the cameraphone case; I again used a bit of putty to hold it into place. Just out of interest - this turns the cameraphone into a pretty decent microscope. The depth of field is rubbish (in my case, about 1-2mm) but the magnification is huge.
Step 4:
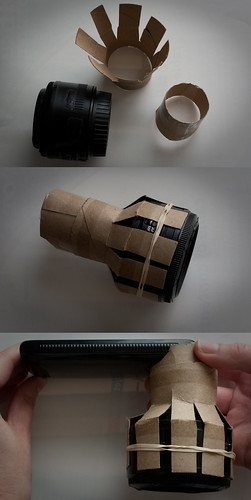
Now that you've got the magnifier lenses in place, I'd recommend building a simple test rig to check roughly the distance you will need between the camera and the back of the SLR lens. The proper thing to do is do some proper calculations involving the measured actual magnification of the lens stack and the flange focal distance of the SLR lens. However, if you lack the equipment for proper measurement, you can estimate by building a set of sliding tubes with an SLR lens attached.
Start off by taking two sections of tubing, one slightly narrower than the other so it can slide inside the other. Cut strips along the tube with wider diameter so you can hold the lens on it using a rubber band. Attach this whole mechanism over the camera phone and magnifier.
The tricky part now is to get this working mechanism to make a picture. You'll need to slide the outer tube back and forth as well as adjusting the focusing ring on the lens, and there'll be a lot of experimentation until you get a sharp picture. If you find that all your images are heavily vignetted, you'll need to add another lens to the magnifier stack.
Step 5:
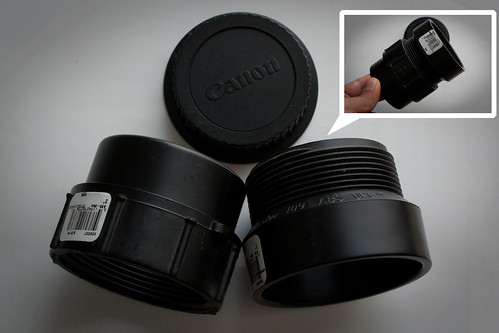
Components for the actual adapter. I used an old end lens cap, and two pieces of two-inch PVC pipe connectors. It was important that the connectors could be connected via a screw thread - this way we can move the whole SLR lens back and forth for secondary focusing.
Step 6:
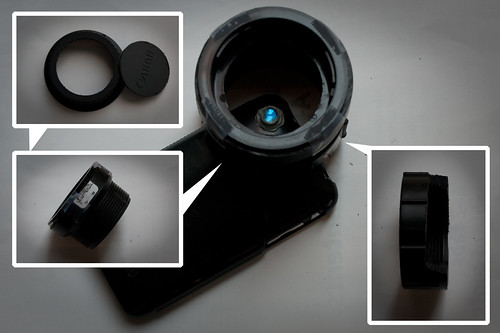
Cut a hole in the lens end cap (inset top left). Use the measurements for the top and bottom cardboard tubes (step 4) to figure out how much you'll need to trim the PVC connectors. The distance that you get from the cardboard tubes should be the same as when the PVC connectors are roughly screwed together halfway, so you get lots of room to move them back and forth. To the top connector, attach the end cap. If you need, cut a notch out of the bottom connector (inset, bottom right) so it fits nicely on the case. Attach the SLR lens just and verify that your measurements are right.
Step 7:
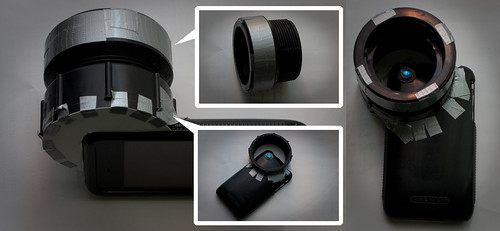
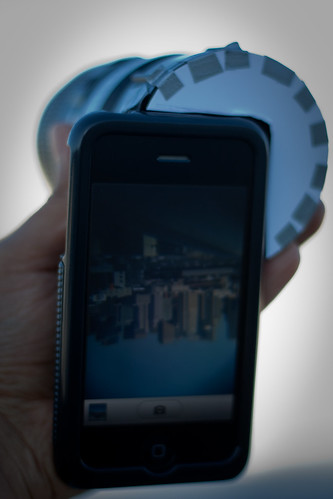
Duct tape madness. Attach the bottom connector to the camera phone case (inset, middle bottom) using thin strips of duct tape. Make sure you get a nice tight fit, but don't go overboard with the tape. Use a bit more tape to also firmly attach the lens cap to the top PVC connector (inset, middle top). Don't forget to attach a bit of cardboard at the back to prevent too much light leakage into the mechanism. Screw the top connector to the bottom, and the Phone-O-Scope is complete (right).
50mm lens attached to the Phone:

18-55mm lens attached to the Phone:
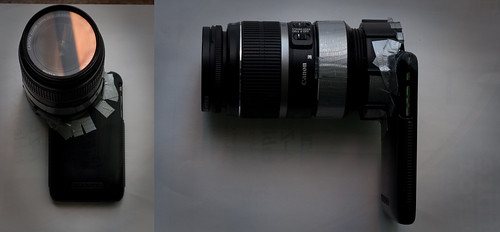
Image quality
As I'd mentioned earlier, the point of this mod is to learn what is needed to successfully build an optical coupler. One important thing to keep in mind is that even if it doesn't work perfectly, it's still a win - I've observed what doesn't work and I'll have a much better idea about how to do it better next time.
The image quality issues come down to two main factors:
1) Optical axis alignment. The phone, lens stack and SLR lens alignment isn't good enough yet. I've found that small alignment errors in the axis - even as little as one or two millimeters - is enough to cause significant portions of the image to become out of focus
2) Image stack lenses used. The lenses are out of a CD player; they're not perfect magnifiers, and, they're designed to work with a specific wavelength of light. This is a significant contributor to the chromatic aberration observed.
Technical issues aside, I'd also say that there is something to be said for having an unpredictable mechanism that prevents you from getting the same photo twice. I've taken a lot of photos with the plungercam, and I've found that although I do take a lot of images that are no good, there are a few that are pretty awesome. And the best bit about that is that I can say with reasonable certainty that it'll be impossible to ever get those same shots ever again. If that doesn't appeal to you, then this type of modification is not for you.
Results
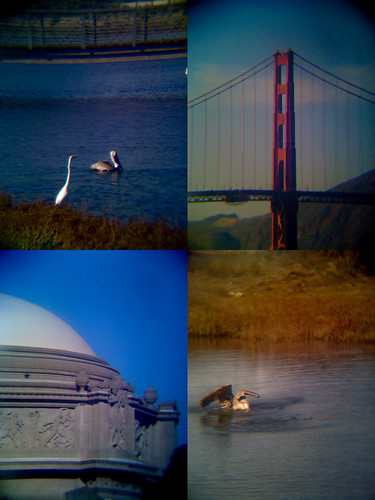
The Phone-O-Scope produces fuzzy, Holga-like images. I think a lot of the image artifacts (strong chromatic aberration, bizarro lens distortion) are down to the extreme magnifier stack. However, I've tested it with a few Canon EF lenses now and it does seem to work reasonably well with every one. At the very least, it seems to work like a telescope for the iPhone, and it is fun to shoot with (not to mention the odd looks I get when I'm using it :)
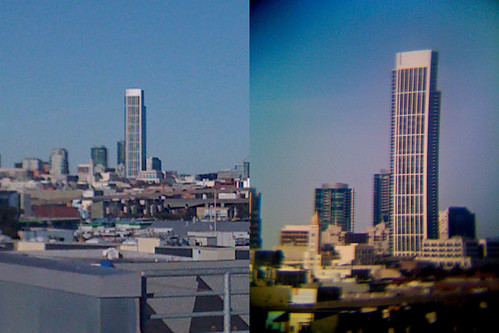
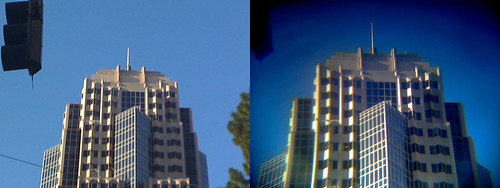
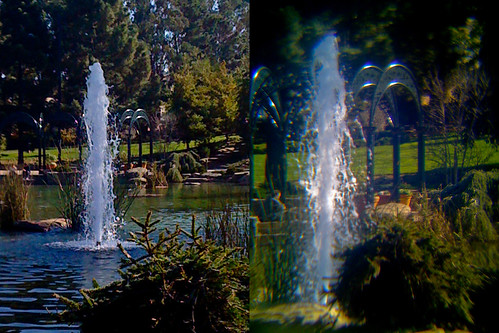
I've got a series of comparison images below; an iPhone picture is on the left, and a Phone-O-Scope image is on the right. In the interest of transparency: I've made some small corrections to the Phone-O-Scope images (exposure, white & black points):
Note the odd barrel distortion and vignetting in the Phone-O-Scope image. Taken with the 18-55mm lens.
The Phone-O-Scope isn't quite as sharp, but you can clearly see how the camera now has a definite DOF effect - in the standard iPhone picture, nearly everything is in focus. Taken with the 50mm lens.
Taken with the 50mm lens.
Taken with the 50mm lens.


No comments:
Post a Comment